
How to Build Your Backpacking Kit: The Big 3
Posted by Potter on 2021 Feb 12th
There are heaps of resources on the River & Trail Talk blog and enough information on the internet to keep you inside staring at your screen indefinitely. I will happily redirect you to some of our staff member’s resources like Taryn’s great article on Hiking safety and etiquette, and Bryan’s geeky plunge into the world of Ultralight Backpacking. If you drop into the store any time there will always be someone here delighted to get into the nitty gritty ins-and-outs of hiking and backpacking gear. If you have a hankering to get intimate with mother nature, but are new to backpacking, as I was a few years ago, this article is for you.
The most important thing to remember: hiking is just walking. If you take joy from putting one foot in front of the other, you are well on your way. Any gear you pick up is only there to help you walk where, when, and as far as you want. There are no great fundamental differences between your gear needs for a 1 night trip through the wilderness versus a 6 month thru-hike. One of the biggest considerations when carrying all your needs on your back is weight. An overly-heavy pack has taken many ambitious backpackers out of action. The most important thing you can do to keep weight down is to trim your kit down to only the essentials. The second is to keep the essentials as lightweight as possible.
A word on Ultralight gear. As an ultralight backpacker, I advise you approach UL labels with a bit of caution. Ultralight design principals are all about getting gear down to the lightest weight possible, but this trimming comes at a cost to performance, comfort, and to your wallet. Ultralight gear is often much less durable than its non-UL counterparts.
Backpackers often refer to the “Big 3” when assembling their gear. These are shelter, sleep system, and pack. These will make up the bulk of the space, weight, and cost of your kit. If you are starting from nothing, I suggest you tackle them in that order. Green backpackers often come in looking for a pack as the number one item on their list. There are many pack options with varying volume, fit, weight, and features to consider, and you can’t really home in on the right pack to meet your needs unless you know what you are carrying in it.
NUMBER 1 - SHELTER

My Big Agnes Fly Creek UL2 Pitched in the Fast Fly configuration in Death Valley
Let’s dive in with number 1 of the Big 3: shelter.
There is a lot to consider when picking the right shelter. Terrain and weather conditions, personal comfort needs, durability, weight, and budget all come in to play. Bryan nicely outlined the different types of shelters in his post on ultralight backpacking shelters. Options vary from a freestanding tent (by far the most popular choice) to cowboy camping under the stars (with an emergency shelter like a bivy or tarp if the weather takes a turn). I am going to focus on 3-season freestanding tents here.
The first choice you need to make is size. Most backpacking tents are sized by the number of people it’s designed to sleep. Be warned, these metrics are usually VERY conservative. Unlike the tent palaces that are popular for car-camping, backpacking tents are designed to be as compact and lightweight as possible. If you buy a one-person backpacking tent, you can expect it to be just big enough to sleep one average male adult with no gear. If you’d rather keep your pack in the tent with you rather than leaving it out in the vestibule, consider a 2-person tent. If you want to sleep 2 people comfortably, a 3-person tent is probably the way to go. Once you know what size tent you need, I would seek the most lightweight tent you can get on your budget.
Big Agnes and MSR make awesome backpacking tents for the casual overnighter to the serious backpacker and everything in between. For options that are a little heavier and bulkier but easier on the budget, Hotcore and the North Face have some great offerings too.
Hammocking
I cannot discuss backpacking shelters without addressing the fabulous but controversial trend that is hammocking. If you have ever gone off-trail backcountry camping you know how challenging it can be to find a decent patch of ground to pitch a tent on. Clearing foliage, and leveling a tent pad can be a very invasive process, not to mention a time consuming pain in the butt at the end of a long day of hiking. A hammock can go up in a cinch anywhere you have 2 trees without the need for any intervention on the ground. The obvious limitation here is the need for trees, which is why most hammockers also have a tent in their gear closet. Comfort is another controversial issue with hammocking. For some, the soft flexible nest is vastly superior to sleeping on the hardground. For others the curve and movement of the cloth is irritating. Cold temperatures can also be problematic in a hammock. All that nice air flow circulating under your body can really cool things down which is ideal for hot weather. On a cooler night an underquilt or pad may be required to keep things warm, and that’s more weight and space in your pack. At the end of the day a hammock can be a great lightweight alternative to tenting if conditions are right.
Check out Hennessy Hammocks, ENO and Thermarest for some great options.
Stakes
Generally when you purchase a tent it will come with stakes, but there are different stakes that are suited for different situations. Shepherd’s crook stakes are cheap, light, and very common but they can pull out easily in loose dirt and are basically useless in sand or snow. I learned this lesson the hard way on a windy night in Death Valley. My tent stakes were no match for the sand dune I was camped on and every time there was a gust of wind my tent pulled free of the stakes and collapsed on me. Exhausted and frustrated I eventually gave up and packed up my tent and just slept under the stars. I don’t regret that spectacular night, and I’ve cowboyed many times since, but I carry better stakes now. I recommend the MSR groundhog as a good versatile option.

MSR Tent stakes come in all kinds of fancy flavours
Footprints
Some tents include a footprint, for others it’s an added feature. Consider this when comparing prices if a footprint is important to you. The footprint should be no larger than the bottom of your tent. I’ve used a slightly oversized footprint for a tent before. That’s a mistake you only make once. If sized properly, a footprint will protect the bottom of your tent from puncture and wear and keep you dry in the rain. If it’s too big, it will collect rain water and channel it under your tent so you wake up in the middle of the night on the Fundy Footpath with your sleeping bag drenched and your phone in a puddle of water.
NUMBER 2: SLEEP SYSTEM

Sleeping bags and quilts are cozy inside and outside the tent!
For most backpackers, having a proper sleep system means at minimum a sleeping bag or quilt and a sleeping pad. On warm summer nights on the beach, I’ve been known to forgo the pad and just snuggle myself a little hollow in the sand, but for cooler nights the pad is essential for warmth as well as comfort.
Temperature ratings in general are very subjective, with people having vastly different needs depending on gender, metabolism, personal comfort level, humidity, etc. There is no universal standard for rating sleeping bag temperatures. Different manufacturers have different standards for temperature rating so these numbers should be used cautiously. If a bag is men’s or unisex, women should add around 8*C to this number. It’s also important to note if a bag is rated for survival or comfort. A comfort rating generally means you should be able to sleep 8 hours on a decent pad with base layers on down to this temperature. A survival rating literally means you probably won’t freeze to death in this bag, no guarantees for lost appendages. No kidding. If a sleeping bag has a temperature on it but does not specify if it is a comfort or survival rating, I’d suggest a little research before you purchase.
Chrissy did a great write-up on how to pick the right sleeping bag.
If Ultralight is more your style check out Bryan’s write up on UB sleep systems.
Quilts are a great option for saving weight and space in your pack. The theory is simple. Compressed insulation is not very warm, so all that insulation on the bottom of your bag is not doing you much good anyway. Quilts save weight by eliminating the excess fabric and insulation underneath and omitting the zipper. Most quilts also nix the hood, or leave it as an optional add-on. Quilts are a great option for milder weather and warm sleepers but they simply aren’t as warm as sleeping bags, and definitely lose some of that cocoon coziness factor.
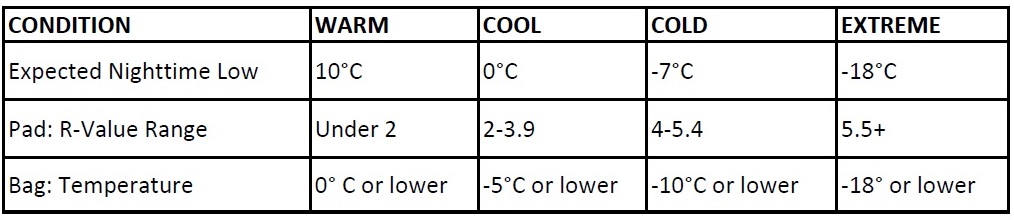
Temperature ratings for sleeping pads are a bit more straightforward. The R-value of a pad is it’s capacity to resist heat transfer from your body into the ground. It is on a 0-10 scale and stacks simply. If you stack 2 pads with an R-value of 2 on top of each other you have a total R-value of 4.
There are 3 basic types of sleeping pads: Inflatable, self-inflating, and closed cell foam. If you are carrying an inflatable or self-inflating pad it is a very good idea to carry a patch kit. Holes happen, even with a well-built product and it’s never fun being stuck sleeping on the cold ground because your sleeping pad won’t hold air. Do not rely on an inflatable pad for your survival. If I am winter camping I always carry a closed-cell foam pad because they are absolutely fool proof. Foam can’t pop. Sometimes on cold days I will carry a foam pad and an inflatable pad for comfort and extra warmth.
Here is a basic guide to help you pick a pad and sleeping bag or quilt. This should only be considered a starting point. It is not gospel. If you are a cold sleeper, consider going a little warmer.
Sleeping Bag Liners
If you want to extend the temperature range of your sleeping bag, or just want to keep your bag from smelling like your hiking socks, consider a sleeping bag liner. Liners come in different shapes and materials from the ultralight silk mummy bag that packs down small enough to fit in your pocket, to warmer more durable types like the Sea to Summit Thermolite Reactor which adds 14°C of insulation. Liners are easy to machine or hand wash and dry quickly, and can also be used instead of a sleeping bag on your next tropical beach getaway.
Pad Inflators
Another item to consider as part of your sleep system is an inflator. These come in the form of hand pumps, mini electric pumps, and inflator sacks which can double as a waterproof stuff sack for your sleep system. If you prefer not to inflate your pad the old fashioned way you’ll want to consider the type of valve on your pad. Some pads are designed to work with certain types of inflators.
Pillows
Finally, some people just can’t get a good quality sleep without a pillow. There are some great lightweight packable pillows out there if that’s a priority for you. The Sea to Summit Aeros is a great UL pillow that packs down into a tiny package.
NUMBER 3: BACKPACK

Potter in Happy Hiker mode
Once you have figured out your shelter and sleep system it’s time to think about a pack. At River & Trail we carry Osprey packs. They are the industry standard in performance, comfort and durability. Osprey packs are made with a variety of volumes, styles, and features and they back up their product really well. Their All Mighty Guarantee covers all of their products for a lifetime, by repair if possible and replacement if not.
Osprey has an online tool called Packfinder to help you pick the right pack for you in their lineup.
A word of caution. If your gear is not ultralight, do not get an ultralight pack. There are a lot of UL packs out there, even some very high volume ones like the Osprey Levity 60L, but if you load them up with heavy gear they will not perform well and they will wear out quickly. The extra weight that goes into a proper frame and suspension system is worth it to distribute the weight you are carrying in a healthy way. Don’t start considering Ultralight packs unless you can get your base weight (total carried weight without food or water) below 10 kg (22lb).
If you are ready to buy a pack, it’s a good idea to come try it on in person. Like hiking boots, not every pack is right for every person. Come by the store and we can measure you and get you fit to the right pack. Sizing is based on a combination of length and hip width. There are different features designed to redistribute weight to your hips, lift the straps off your shoulders, and get some ventilation behind your back. We can help you select and adjust the pack so it’s just right for your body. If you have part of your kit already, bring it along. You can practice packing it and see what kind of volume you need to fit everything comfortably.
Frame
Most backpacking packs except the very lightest are designed with some sort of rigid frame. In the olden days these frames were an external structure, now they are generally integrated into the pack internally. The purpose of the frame is to redistribute the weight and keep it off your back and shoulders. It’s much less work to carry a heavy load on your hips rather than on your shoulders.
Packing style
Traditionally packs are top-loaders, but some packs offer options to access the contents from below, or even open up suitcase-style in the front (more favored among urban backpackers). Bottom loading packs can save a lot of hassle when you need to pull something out that’s buried all the way at the bottom of your pack.
Pockets and compartments
Some packs are basically just one big space for stuffing gear, while others offer a range of compartments to help organize your gear while you are out. Hip belt pockets, side, pockets and external mesh pockets make it easy to access your snacks, water, filter, etc without having to rummage in the main compartment. Some are designed specially to accommodate a water bladder system. Many packs come standard with a brain on top which is often removable. All of these options can ease your experience in the backcountry, but come at a cost of extra weight.
Pack covers and liners
If you spend enough time outdoors, eventually you are going to get caught in the rain. Don’t be caught unprepared. Essential items like down jackets and sleeping bags should be carefully kept dry. One way to do this on the trail is with a pack cover. A good pack cover wraps around the outside of the pack and sheds water like a rain jacket, protecting your pack and all its contents from the elements. They are not foolproof though. A persistent soaking rain will channel water behind your back and eventually seep in past even the most resilient pack cover. A pack cover will also not keep your gear dry if you stumble on a river crossing. Keep your sacred dry clothes, electronics, and sleep system in a watertight plastic bag or stuff sack to be safe. Some hikers (myself included) favor a pack liner instead of a pack cover. A hefty trash bag works just fine if you are careful but there are sturdier options on the market as well. Osprey has a great line of pack liners that are suited to various packs volumes. The downside to the liner is if used exclusively your pack will still get soaked even as the contents are kept dry. Some people use both. That is of course more weight. It’s up to you.
With the big 3 out of the way you are almost ready to get out into the wild!